You smell something musty. Maybe you’ve had water damage in the past, or your allergies have gotten worse since moving in. You suspect mold might be growing somewhere in your home—but you can’t see it.
Hidden mold is one of the most frustrating problems property owners face. Wondering Do I Need a Mold Test? Here's how professionals find mold you can't see. It can grow for months inside wall cavities, beneath flooring, and in other concealed spaces before revealing itself. By the time visible signs appear, the problem has often spread significantly.
Why Mold Hides So Well
Mold doesn’t need light to grow. It needs moisture, organic material to feed on, and time. Wall cavities, the spaces beneath flooring, and areas above ceiling tiles provide all three—plus darkness and still air that help mold thrive undisturbed.
When a slow leak wets the back side of drywall, or moisture accumulates in a subfloor, mold can colonize those materials without any visible indication on the surfaces you see. The mold is literally growing on the hidden side of your walls and floors—the side facing the wall cavity or crawl space rather than your living area.
This is why visual inspection alone often isn’t enough. Professional mold detection uses multiple tools and techniques to find what eyes can’t see.
Moisture Detection: Finding the Source
Mold requires moisture, so finding hidden moisture often means finding hidden mold—or at least identifying where mold is likely to develop. Professionals use several tools to locate moisture that isn’t visible on the surface.
Pin-type moisture meters insert small probes into building materials to measure moisture content directly. By taking readings at multiple points, inspectors can map moisture patterns and identify the wettest areas—which are often the areas with the most significant mold growth. These meters work well on wood, drywall, and other porous materials.
Pinless moisture meters use electromagnetic signals to detect moisture without penetrating the material. They’re useful for scanning large areas quickly and for checking materials where pin holes would be undesirable, like finished hardwood floors. While less precise than pin-type meters, they help identify areas that warrant closer investigation.
Moisture meters can detect elevated moisture content inside walls, under flooring, and in other concealed areas—revealing water intrusion that may have led to mold growth even when surfaces appear dry.
Thermal Imaging: Seeing Temperature Differences
Infrared cameras detect temperature variations across surfaces. Wet materials conduct heat differently than dry materials, creating temperature patterns that show up clearly on thermal images.
Areas with hidden moisture often appear cooler than surrounding dry areas because evaporation creates a cooling effect. An inspector scanning a wall with a thermal camera might see a distinct cool spot that corresponds to a leak or moisture intrusion behind the drywall—even though the wall surface looks completely normal.
Thermal imaging is non-invasive and can quickly survey large areas. It’s particularly useful for identifying moisture patterns in walls, ceilings, and floors, and for pinpointing areas where more detailed investigation is warranted. However, thermal imaging shows temperature differences, not mold directly—so it’s typically used alongside other detection methods.
Air Sampling: Testing What You Breathe
When mold grows, it releases spores into the air. Air sampling captures spores for laboratory analysis. Professional mold testing reveals whether mold levels are elevated compared to outdoor air or unaffected areas of the home.
The process uses a calibrated pump that draws air through a collection device—typically a spore trap or culture plate. Samples are taken from areas of concern, from unaffected comparison areas, and from outdoor air. Elevated spore counts indoors compared to outdoors suggest mold growth somewhere in the building.
Air sampling is particularly valuable when you suspect hidden mold but can’t locate it visually. If indoor spore levels are significantly higher than outdoor levels, mold is actively releasing spores somewhere—even if you can’t see the source. The types of mold identified can also provide clues: certain species associated with water damage suggest active moisture intrusion.
One limitation: air sampling is a snapshot. Spore levels fluctuate based on air movement, humidity, and other factors. A single test captures conditions at one moment, which is why experienced inspectors interpret results carefully and may recommend additional sampling.
Surface Sampling: Identifying What’s Growing
When suspected mold is accessible—even if it’s in a hidden location that’s been opened for inspection—surface sampling identifies exactly what’s growing there.
Tape lift samples use clear adhesive to lift material directly from a surface. The tape captures spores and sometimes fragments of mold growth, which are then analyzed under a microscope. This method identifies mold types and confirms whether what you’re seeing is actually mold versus staining or other discoloration.
Swab samples collect material by rubbing a sterile swab across the surface. These samples can be analyzed microscopically or cultured to grow and identify viable mold.
Bulk samples remove a small piece of the affected material itself—a section of drywall, carpet, or other building material. Laboratory analysis can identify mold types and assess how deeply the contamination penetrates.
Surface sampling requires access to the suspected mold, so it’s often used after other methods have identified areas of concern or when an inspector has opened a wall or floor to investigate.
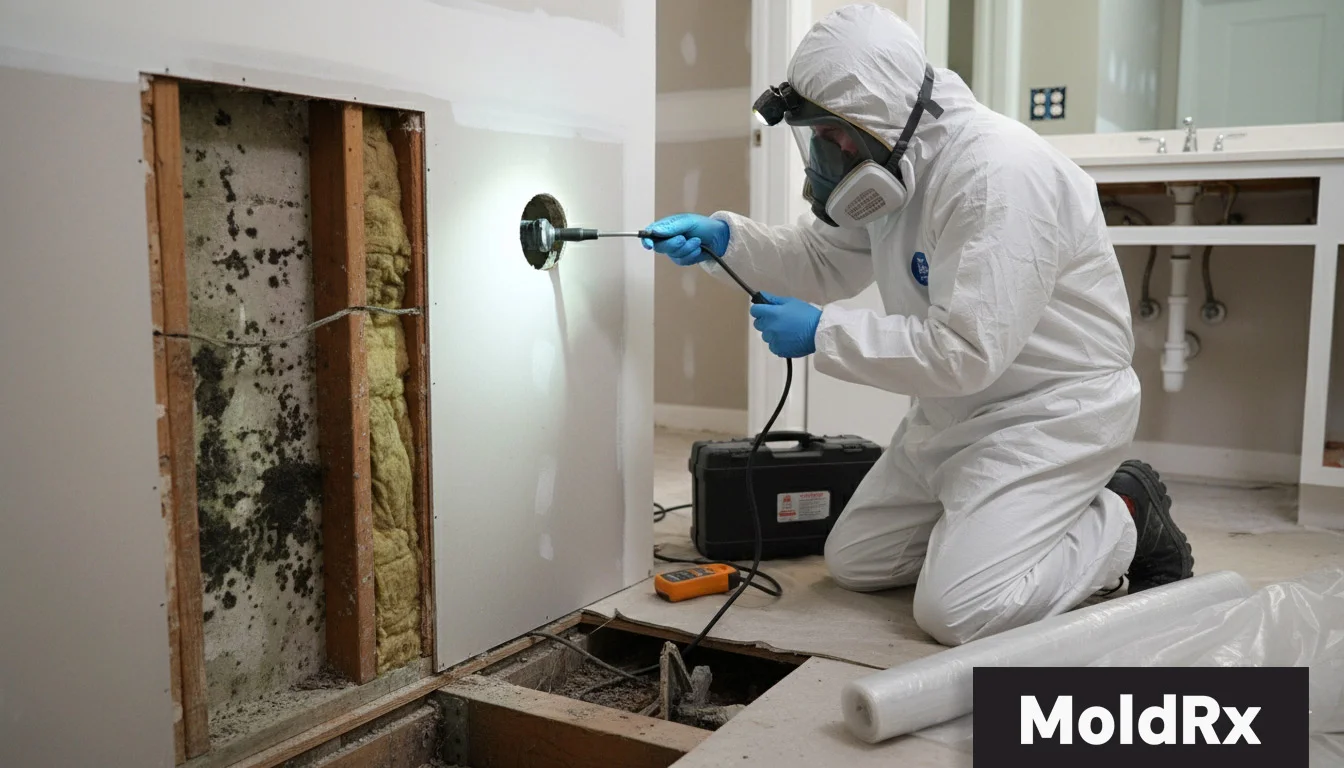
Borescopes: Looking Inside Walls
Sometimes the most effective way to find hidden mold is to look directly into concealed spaces. Borescopes—small cameras on flexible cables—allow inspectors to see inside wall cavities, ceiling spaces, and other enclosed areas through small access holes.
A typical inspection might involve drilling a small hole through drywall and inserting the borescope camera to visually inspect the wall cavity. The camera can reveal mold growth on the back side of drywall, on framing members, or on insulation—contamination that would be invisible from the room side of the wall.
Borescope inspection is minimally invasive—the holes are small and easily patched—but provides direct visual confirmation of conditions inside concealed spaces. It’s particularly useful when moisture meters or thermal imaging have identified areas of concern, and the inspector needs to see what’s actually happening inside the wall.
Putting It All Together
Professional mold detection rarely relies on a single tool or technique. A thorough inspection typically combines multiple methods:
The inspector starts with a visual assessment of the entire space, looking for signs of water intrusion, staining, or conditions that favor mold growth. They’ll ask about the property’s history—past leaks, flooding, plumbing problems, or moisture issues.
Moisture mapping with pin-type and pinless meters identifies areas with elevated moisture content. Thermal imaging may reveal temperature patterns that suggest hidden moisture.
If moisture is found, or if symptoms and odors suggest mold despite no visible growth, air sampling can determine whether spore levels are elevated. Surface sampling confirms mold in specific locations.
When warranted, invasive inspection using borescopes or limited demolition provides direct visual confirmation of conditions inside wall cavities and other concealed spaces.
The goal isn’t just to find mold—it’s to understand the full scope of the problem, identify the moisture source that allowed mold to grow, and develop an appropriate remediation plan.
What Happens After Detection
Finding hidden mold is the first step. What comes next depends on what the inspection reveals.
If mold is confirmed, remediation planning considers the extent of contamination. Professional mold remediation addresses the full scope of the problem. Learn about What Happens During Mold Remediation. Hidden mold often requires removal of building materials—drywall, insulation, flooring—to access and eliminate the contamination.
Addressing the moisture source is essential. Removing mold without fixing the water problem means the mold will return. Whether it's a roof leak, plumbing failure, or water damage, the underlying moisture intrusion must be corrected for remediation to be successful long-term.
Concerned About Hidden Mold?
MoldRx coordinates professional mold testing and mold remediation services throughout Orange County, Riverside County, and San Bernardino County. If you suspect hidden mold in your property—because of musty odors, unexplained symptoms, or past water damage—our vetted specialists can assess your situation using the detection methods that make sense for your circumstances.
Not every situation requires extensive testing. Sometimes a visual inspection and moisture assessment provide all the information needed. We’ll give you honest guidance about what’s warranted for your situation. Contact MoldRx to discuss your concerns.