Mold remediation is done. The containment is still up, the crew is waiting, and now someone needs to answer a straightforward question: did the work actually succeed?
Clearance testing is the answer. It's an independent verification that mold remediation was successful, performed by comparing indoor air quality and surface conditions in the remediated area against outdoor baselines and unaffected areas of the home. If the results show that spore levels are comparable to or lower than those baselines, the project passes. If they don't, the remediation company goes back to work.
This isn't optional paperwork. Clearance testing is the single most important quality control step in the entire mold remediation process, and understanding what it involves puts you in a much stronger position as a homeowner.
What Clearance Testing Is
Clearance testing -- sometimes called post-remediation verification (PRV) or post-remediation testing -- is a formal evaluation conducted after mold remediation to confirm that contamination has been effectively removed and that the indoor environment is safe for reoccupation and reconstruction.
The process involves an independent inspector collecting air samples, surface samples, and visual observations from the remediated area. Those samples are sent to an accredited laboratory for analysis. The laboratory results are then compared against control samples -- typically outdoor air and air from unaffected areas of the home -- to determine whether the remediation met its objectives.
The core principle is simple: after remediation, the air and surfaces in the work area should look no different from what you'd find in a clean part of the home or outside. If spore types and concentrations in the remediated space are comparable to or lower than outdoor and unaffected indoor levels, the project passes clearance. If certain mold types are still elevated or if the overall spore load remains significantly higher than the controls, it fails.
This follows the methodology outlined in the IICRC S520 Standard for Professional Mold Remediation, which is the industry's primary reference for how remediation should be conducted and verified.
When Clearance Testing Is Required vs. Recommended
In some situations, clearance testing is mandated. In others, it's strongly recommended even when no regulation demands it.
When It's Required
Insurance claims. If your mold remediation is covered by homeowner's insurance, your carrier will almost certainly require clearance testing documentation before approving the claim or authorizing reconstruction. Without it, you may have difficulty getting reimbursed for the remediation or the rebuild that follows.
Real estate transactions. If mold was discovered during a home inspection and remediation was performed as a condition of the sale, the buyer's lender or the buyer themselves will typically require clearance documentation. This protects the buyer and provides legal documentation that the issue was resolved before closing.
Local ordinances and commercial properties. Some jurisdictions and commercial building codes require third-party clearance testing for mold remediation projects above a certain size. Requirements vary, so check with your local building department if you're unsure.
When It's Strongly Recommended
Every residential mold remediation project. Even when no regulation or insurance policy demands it, clearance testing should be standard practice. Without it, you're trusting that the work was done correctly based on nothing more than the remediation company's word. A reputable company will expect and welcome clearance testing. If a company discourages it, that's a significant red flag -- and one we discuss in our guide on how to choose a mold remediation company.
After any project involving concealed spaces. When mold was growing inside wall cavities, under flooring, or in other areas that will be sealed up during reconstruction, clearance testing is especially critical. Once drywall goes back up, you lose the ability to visually inspect those surfaces. Testing while the framing is still exposed is your last chance to confirm the work was thorough.
Who Should Perform Clearance Testing
This is one of the most important points in this entire guide: the company that performed the mold remediation should not be the company that performs clearance testing.
The reason is straightforward. The remediation company has a financial interest in the project passing clearance. If the same company tests its own work, there's an inherent conflict of interest. An independent third-party inspector has no stake in the outcome -- they're paid the same whether the project passes or fails, which means their only incentive is accuracy.
This separation between the remediator and the tester is a best practice recognized by the IICRC S520 standard, the American Industrial Hygiene Association (AIHA), and most insurance carriers. Many insurance companies will not accept clearance results from the same company that performed the remediation.
What to look for in a clearance testing provider:
- Credentials. Look for a Certified Industrial Hygienist (CIH), Council-certified Microbial Investigator (CMI), or ACAC-certified inspector.
- Accredited laboratory. The inspector should send samples to an AIHA-accredited laboratory -- not an in-house lab or uncredited facility.
- No affiliation with the remediation company. Ask directly: are you affiliated with, employed by, or receiving referral fees from the remediation company? If the answer is anything other than a clear no, find someone else.
If you hired MoldRx for remediation, we'll coordinate with an independent testing professional on your behalf -- but the tester works for you, not for us.
What the Process Involves
Clearance testing isn't a single test. It's a multi-step evaluation that combines visual inspection, air sampling, surface sampling, and moisture verification. Each component serves a different purpose, and a thorough clearance evaluation includes all four.
Step 1: Visual Inspection
Before any samples are collected, the inspector conducts a detailed visual examination of the entire remediated area. This happens while containment is still in place and before any reconstruction begins, so all treated surfaces are fully exposed and accessible.
The inspector is looking for:
- Any remaining visible mold growth on framing, subfloor, sheathing, or other structural elements
- Staining or discoloration that might indicate incomplete removal
- Debris or dust that could contain residual spore material
- Proper containment integrity -- is the plastic sheeting intact, are seals holding, is negative air pressure maintained
- Evidence that the moisture source has been addressed
If the visual inspection reveals remaining mold growth or inadequate work, the inspector may stop the evaluation without collecting samples. There's no point in running lab analysis if the area visibly fails. The remediation company addresses the deficiencies, and the inspector returns for another evaluation.
Step 2: Air Sampling
Air sampling is the centerpiece of clearance testing. The inspector uses a calibrated air sampling pump that draws a known volume of air through a collection cassette -- typically a spore trap that captures airborne particles on a sticky collection surface.
Samples are collected from multiple locations:
- Inside the containment area -- one or more samples from within the remediated space
- Outside the home -- an outdoor control sample that establishes the baseline for what's normal in the ambient environment
- Unaffected indoor areas -- samples from clean areas of the home that were not part of the remediation, providing an indoor comparison
Each sample is collected for a standardized duration and flow rate so the laboratory can calculate spore concentrations per cubic meter of air. The cassettes are sealed, labeled with their collection location, and sent to an AIHA-accredited laboratory for analysis.
Step 3: Surface Sampling
Surface sampling supplements air sampling by directly evaluating the condition of treated materials. The inspector may use one or more methods:
- Tape lifts -- clear adhesive tape pressed against a surface to capture whatever is present. This is the most common method for clearance verification.
- Swab samples -- a sterile swab rubbed across a surface to collect material from crevices in wood framing or rough-textured surfaces.
- Bulk samples -- small pieces of material removed for laboratory analysis when the inspector needs to evaluate whether contamination penetrated below the surface.
Surface samples are particularly valuable for confirming that wood framing and other semi-porous materials were adequately treated. Air can be clean while surfaces still harbor residual contamination -- surface sampling catches what air sampling might miss.
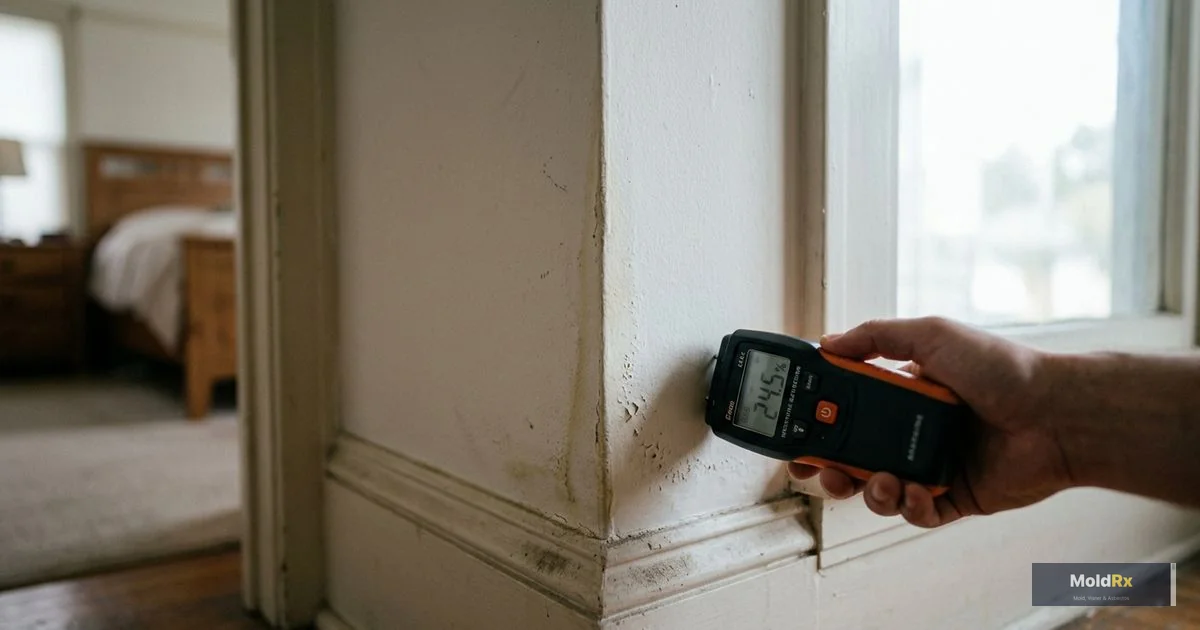
Step 4: Moisture Verification
Mold cannot grow without moisture. Even if every spore has been removed, the problem will return if the moisture source hasn't been resolved. As part of clearance, the inspector uses moisture meters and sometimes thermal imaging to verify that:
- Moisture content in building materials is within acceptable ranges -- typically below 16% for wood framing and below 1% for concrete or masonry
- The original moisture source has been identified and addressed -- whether it was a plumbing leak, roof intrusion, condensation issue, or flooding event
- No new moisture intrusion has occurred during the remediation process
If moisture readings are elevated, that's a red flag even if air and surface samples come back clean. The inspector will note this in the report, and the underlying issue needs to be resolved before reconstruction proceeds.
How to Read Clearance Testing Results
The laboratory report can look intimidating -- columns of Latin names, spore counts, and concentrations. Here's how to make sense of it.
The Key Numbers
The report will list each sample location and provide:
- Mold types identified -- genus-level identification (e.g., Cladosporium, Penicillium/Aspergillus, Stachybotrys) for each sample location
- Raw spore counts -- the number of spores of each type observed on the sample
- Concentration -- spore counts per cubic meter of air (spores/m3), calculated from the raw count, the sample volume, and the flow rate
What Passing Looks Like
A passing clearance result generally shows:
- Total spore counts in the remediated area are comparable to or lower than outdoor and unaffected indoor control samples. There is no single numeric threshold that defines "pass" or "fail" -- the comparison to controls is what matters.
- The types of mold found inside are consistent with what's found outside. Outdoor air typically contains Cladosporium, Penicillium/Aspergillus, basidiospores, and other common environmental molds. Finding these same types at similar or lower levels inside is normal.
- Mold types associated with water damage are absent or present only at trace levels. This is critical. Species like Stachybotrys (commonly called "black mold"), Chaetomium, and certain Aspergillus species are water-damage indicators. If these are elevated in the remediated area but absent or minimal in outdoor and control samples, the remediation may not have been complete.
- Surface samples show no significant fungal growth. Tape lifts and swab samples should show background levels of spores consistent with settled dust -- not active growth or dense spore deposits.
What Failing Looks Like
A failing result typically shows one or more of the following:
- Total spore counts in the remediated area are significantly higher than outdoor and control samples
- Water-damage indicator species are present at elevated levels compared to controls
- Mold types are found inside that aren't present in outdoor air, suggesting an indoor source
- Surface samples show active growth or dense spore deposits on treated materials
- Visible mold was identified during the inspection component
The inspector's report will explain which criteria were not met and provide recommendations for additional work.
What Happens If Clearance Testing Fails
A failed clearance test doesn't mean the remediation was a disaster -- it means additional work is needed before the project can be considered complete. Here's what the process looks like.
1. The remediation company reviews the results. The inspector shares the report with the remediation team, identifying which areas or materials showed elevated levels. This tells the crew where to focus their additional work.
2. Additional remediation is performed. The crew returns to address the specific deficiencies -- additional cleaning of framing, removal of materials that were initially preserved but are still contaminated, extended HEPA filtration, or reapplication of antimicrobial treatments.
3. Clearance testing is repeated. The independent inspector returns and conducts a new round of testing following the same protocol -- visual inspection, air sampling, surface sampling, and moisture verification.
4. The cycle repeats until the project passes. A responsible remediation company will continue working until clearance is achieved. This is one reason why the separation between remediator and tester matters -- it creates accountability. If the company doing the work also controls the testing, there's less incentive to get it right.
Who pays for re-testing? This varies. Some remediation companies include one re-test in their project cost. Others consider additional testing to be a separate expense. Clarify this before work begins. At MoldRx, if a project doesn't pass clearance on the first attempt, we go back and do the additional work -- that's part of getting the job done right. Learn more about what happens during mold remediation and the full scope of a professional project.
Clearance Testing and the Bigger Picture
Clearance testing doesn't exist in isolation. It's the verification step in a larger process that begins with assessment and ends with reconstruction and long-term monitoring.
Before remediation: Professional mold testing establishes baseline conditions and identifies the scope of contamination. This pre-remediation data gives the clearance inspector a reference point for evaluating whether the work addressed the full problem.
During remediation: Containment, removal, HEPA filtration, and antimicrobial treatment all happen within a controlled environment. The quality of this work directly determines whether clearance testing will pass.
After clearance: Once the project passes, containment comes down and reconstruction begins. Our guide on what to expect after mold remediation covers the full recovery timeline -- from when air quality normalizes to how long you should monitor for recurrence.
Keep your clearance testing report. It's valuable for insurance claims, future real estate transactions, and your own peace of mind. If mold is ever discovered in your home again, documentation of previous successful clearance demonstrates that the current issue is a new event -- not a continuation of the old one.
Frequently Asked Questions
How long does clearance testing take?
The on-site evaluation typically takes one to three hours, depending on the size of the remediated area and the number of samples collected. Laboratory analysis usually requires 24 to 48 hours for standard turnaround, though rush processing is available.
Can I be in the home during clearance testing?
Yes, but stay out of the containment area while samples are being collected. Your movement can disturb settled particles and affect the accuracy of air samples. The inspector will let you know when it's appropriate to enter.
Is clearance testing the same as a mold inspection?
No. A mold inspection is an investigative process to determine whether mold is present, where it's growing, and what's causing it. Clearance testing is a verification process conducted after remediation to confirm the work was successful. They use some of the same sampling methods but serve different purposes.
What if the remediation company says clearance testing isn't necessary?
Find a different company. Any remediation professional who discourages independent verification of their work is either cutting corners, concerned about what testing might reveal, or both. Clearance testing is standard practice, and reputable companies expect it. For more on evaluating remediation companies, see our guide on how to choose a mold remediation company.
Does clearance testing guarantee mold won't come back?
No. Clearance confirms that existing contamination has been removed -- it doesn't prevent future growth. Mold recurrence depends on moisture control. If the moisture source is fixed and you maintain humidity below 60%, the chances of recurrence are very low. If moisture issues return, mold can reestablish regardless of how thorough the original remediation was.
How much does clearance testing cost?
Costs vary based on the size of the remediated area and the number of samples required, but most residential clearance evaluations fall in a range that's modest compared to the overall cost of remediation. We don't publish specific pricing because every project is different -- call us at (888) 609-8907 to discuss your situation.
Can I use a home mold test kit instead of professional clearance testing?
No. Retail test kits use settle plates that cannot quantify spore concentrations or provide the comparative analysis that clearance testing requires. They are not accepted by insurance companies, real estate professionals, or any industry standard as verification of remediation success. Clearance testing requires calibrated equipment, accredited laboratory analysis, and interpretation by a qualified inspector.
Should clearance testing happen before or after reconstruction?
Before. Always before. Clearance testing must be performed while the remediated area is still exposed -- framing visible, containment in place, no new drywall installed. Once reconstruction covers treated surfaces, you lose the ability to visually inspect or sample them. If testing reveals a problem after walls are closed up, you'd have to tear them back out.
What credentials should a clearance testing inspector have?
Look for a Certified Industrial Hygienist (CIH), Council-certified Microbial Investigator (CMI), or ACAC-certified inspector. The inspector should also use an AIHA-accredited laboratory for sample analysis. Most importantly, the inspector should be completely independent from the remediation company.
What if I skipped clearance testing and reconstruction is already done?
You can still have air sampling performed to get a general picture of indoor air quality. However, this after-the-fact testing is less definitive than proper clearance testing conducted before reconstruction. If the air samples come back clean, that's encouraging. If they show elevated mold levels, you may be facing the prospect of opening walls back up to investigate -- which is exactly the situation clearance testing is designed to prevent.
Get It Verified the Right Way
Clearance testing is the difference between hoping remediation worked and knowing it did. It protects your health, your home, and your investment in the remediation process. Without it, you're closing up walls on faith.
If you're planning mold remediation or have questions about clearance testing for a project that's already underway, MoldRx can help. We coordinate with independent, certified testing professionals to ensure every project is verified to industry standards.
Call (888) 609-8907 or request a free estimate to get started.